The hip thrust is a very popular exercise. It is tough to go online or into a gym and not see someone doing a hip thrust. And hey, I get it! When I was in college studying to become a personal trainer, we were shown a study that showed that the hip thrust is the exercise that gets you the most muscle activation from your glutes (the group of muscles that make up the bootay).
This makes sense when you really think about it as well – you get maximum extension, or lengthening, of the muscles, which leads to maximum contraction, or shortening, of the muscles. You get the full scope of contraction, which is great for building muscles.
But only if you do it right.
Which is what brings me to why I wanted to write this article. My best friend, an icon, a legend, I love her, but I digress – is back in the gym building the revenge body for the gods. So when she sent me a text asking me why her lower back was hurting while doing a hip thrust, I knew that there would be a lot of other women out there who were in the same situation.
So to help you build the booty of your dreams, without the back ache, here’s a step-by-step article that breaks down how to do a hip thrust.
What to Think About When Performing This Exercise
Something that I found really helped me improve my technique when I started studying anatomy and lifting weights was to really connect my mind to the area of the body I was training.
In a hip thrust, the target muscles in your glutes, however you also want to think about keeping your core engaged and driving the weight starting in the midfoot/heels. I think about what angle my knees should be to make sure I am not risking injury in my knees, but also make sure my hamstring don’t take over the movement.
Maybe this is because I am an overthinker, but for these large, compound movements, I would love it if you go into the habit of thinking about your technique and what muscles you should and should not feel.
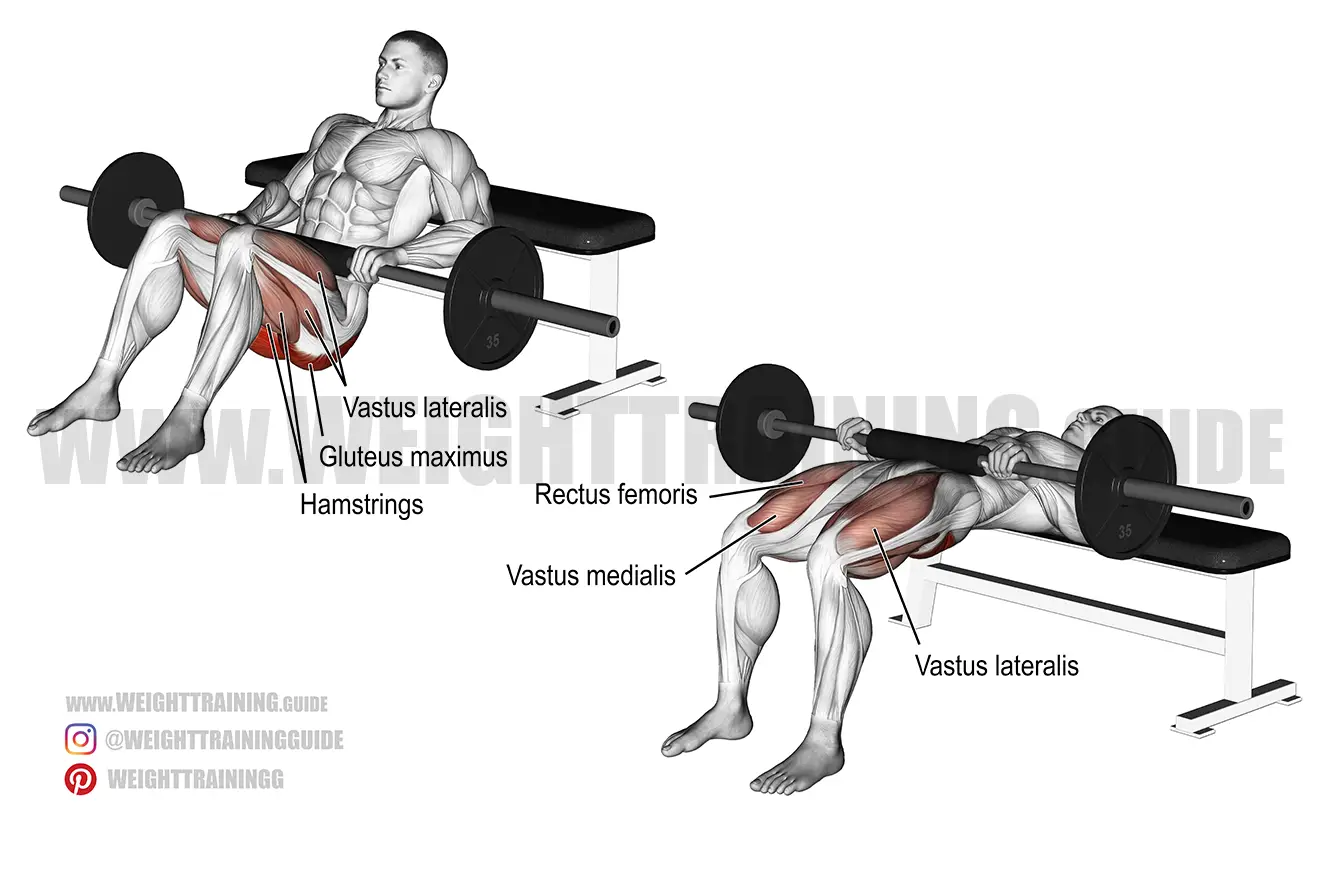
You can see in the image about that they highlight the glutes, but also almost all of the major muscles in the thighs. Which leads me nicely into the technique breakdown of this movement.
Hip Thrust Technique Breakdown
I am going to break this down into numbers steps based on how I set up for the exercise, how it starts, and how it ends. Please note that I am explaining the technique as if I was doing the exercise with a bench and barbell as my weight.
- Sit in front of a bench that is secured to the floor, or pushed up against a wall.
- Line up the edge of the bench with the middle of your shoulder blade. If you lift your arms like you are doing the chicken dance, the edge of the bench should be aligned with the corner of your armpit.
- (Safely) grab the weight and lay it evenly at the crease of your hips, below the below and above the thighs. You do not want the bar sitting on the hip bones, but just below them.
- Walk out your feet so that when you push your bum off the floor, your knees create an angle that is just slightly bigger than 90 degrees (right angle). Your feet should be planted just outside of hip-width apart.
- When you think you have your feet in the correct position, place your hands on the bar about 10cm/5inches away from your hips on either side. This should be a little outside of shoulder width apart.
- Hold the bar tight to secure your upper body then press the hips ups, driving through your mid-foot and heel.
- At this point you can adjust your footing and position on the bench to make sure you feel balanced.
- When you are in a bridge position, this is the start of the exercise. Notice how your body is in a flat, bridge position.
- As you begin to lower your bum and the weight with it, you want to keep the distance between your ribs and your pelvis the same.
- This is where most people go wrong!
- Do Not: just drop your bum to the ground, arching your lower back like you are twerking.
- If you chest is puffed up the sky, your ribs are flared, and your lower back is arched, you are in the wrong position and will end up with a sore back.
- Lower until you are just slightly hovering above the ground.
- Then drive the bar up, generating your power from pushing through your mid-foot to heel.
- Be sure to give your glutes a good squeeze to return your body to the bridge position.
- Repeat this for your desired number of reps for 1 set of the hip thrust.
“A Hip Thrust is Lying Down Deadlift”
To help you mentally process what the hip thrust is supposed to look like, I want to share something that I shared with my friend. She knows what a deadlift is, so she understands that mechanics of it. If you are unfamiliar with the deadlift, I have an article about how to do a deadlift, that includes links to some helpful video tutorials.
The hip thrust is in the same family as the deadlift. These are hip hinging movements that focus on the extension of the glutes and hamstring, followed by a powerful contraction to build up strength and musculature in the posterior chain.
That’s all fancy, personal trainer talk for they build a great butt and legs. I am actually partial to the deadlift and would say it would be my go-to exercise for building my glutes over hip-thrusts, but I also know it is highly technical. The hip thrust is a good way to start hip-hinging without necessarily having to learn the deadlift technique.
But if you do know how to deadlift, you know that you try to avoid arching your lower back because that leads to lower back pain from deadlifting. The same is true in the hip thrust.
So there you have it! These are my tips to help you avoid injuring your back while performing a hip thrust at the gym. It is a very common exercise and very commonly done wrong. But my hope is that after reading this, you’ll feel more confident to do this exercise correctly and will reap all of the booty-building-benefits from it.
Happy lifting!
